Web Factory Reference Manual


Using the Web Factory Toolbars


Note: As a reminder of the function of each toolbar button, Web Factory provides tool tips, which momentarily display the name of a toolbar button when your mouse cursor rests over the button.


Standard Toolbar

The Standard Toolbar allows you to accomplish the following functions with a single click on the corresponding button: new file, open file, save file, print, spell check, cut, copy, paste, and undo last action.

The Standard Toolbar is available at all times. If it is not in view, choose Standard Toolbar from the View menu to display it. A check mark beside this menu option indicates the Toolbar is currently displayed.


Formatting Toolbar

Available when the current file is in a preview window.
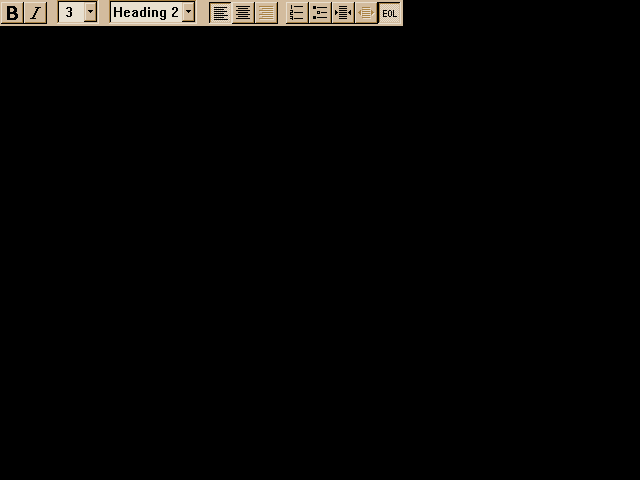
The Formatting Toolbar allows you to accomplish the following text and paragraph formatting by clicking on the corresponding button or drop-down list: bold, italic, font size, paragraph style, align paragraph left, align paragraph center, align paragraph right, ordered list, bulleted list, indent, unindent, and show format marks.

To apply bold or italic formatting or to change the size of the text, first select the text you want to affect, then use the toolbar.

To change the style of a paragraph from "normal" to a heading or other paragraph style, click the cursor anywhere within the paragraph then select the paragraph style. Likewise, to change the alignment of a paragraph, or to indent or unindent, first click the cursor within the paragraph, then click the desired alignment toolbar button. Internet Explorer does not support right alignment of paragraphs.

To add a list, first position the text cursor where you want the list to start, then click the toolbar button. You can also drag and drop ordered lists and bulleted lists from the toolbar to the desired spot on the Web page.

To display the Formatting Toolbar, choose Formatting Toolbar from the View menu. A check mark beside this menu option indicates the Toolbar is currently displayed.


Elements Toolbar

Available when the current file is in a preview window.

The Elements Toolbar allows you to insert the following HTML elements into your Web page with a single click on the corresponding button: link to another Web page; link to anchor on this page; make anchor on this page; link to email address; image; image map; horizontal rule; new table; new cell; split cell; new row.

To add a link, first select the text you want to be the hypertext link, then click the toolbar button. When making an anchor, you can either select the word(s) to be the anchor, or just click to insert the anchor. Anchors are not marked for users to see.

To add an image, horizontal rule, new table or table element to the Web page, first click the cursor where you want to insert the element. Then click the toolbar button. You can also drag and drop images, image maps, horizontal rules, and new tables from the toolbar to the desired spot on the Web page.

To add an image map, first click on the image you want to add a map to, if it is already in the page. Then click the toolbar button. If no image is selected, the Open box will appear, allowing you to select an image. You can also drag and drop images, image maps, horizontal rules, and new tables from the toolbar to the desired spot on the Web page. See Insert menu, Image Map for further instructions on creating a client-side image map.

To display the Elements Toolbar, choose Elements Toolbar from the View menu. A check mark beside this menu option indicates the Toolbar is currently displayed.


Forms Toolbar

Available when the current file is in a preview window.

The Forms Toolbar allows you to insert a form and any of the following form elements into your Web page by clicking on the corresponding button: new form, text area, selection, option, text field, password, check box, radio button, submit button, reset button.

To add a form or a form element, click the cursor where you want to insert the element, then click the toolbar button.

To display the Forms Toolbar, choose Forms Toolbar from the View menu. A check mark beside this menu option indicates the Toolbar is currently displayed.


Test View Navigation Toolbar

Appears automatically when the current file is in the test view window.

The Test View Navigation Toolbar allows you to navigate among Web pages on your hard drive or network, in the test view window. Much like the buttons on a Web browser, they include the following options, from left to right:

  • Back - Displays in the test view window the Web page that was displayed immediately prior to the current page.
  • Forward - If you have already used the Back button, this displays the Web page that was displayed prior to the current page.
  • Home - Displays the Web page that was the first page viewed in the test view window during this session.
  • Reload - Reloads the current Web page so you can see any changes you made and saved in the preview or source windows.
  • Open - Displays the Open box, which allows you to select and load a different Web page (*.htm or *.html file on your hard drive or network) in the test view window.

Area Toolbar

Available when the current file is an image file in the image editor.

The Area Toolbar allows you to select an area of the current image, using the following tools:

  • Drag Box -- Allows you to select an area by clicking on the image and dragging a rectangular box around the portion of the image you want to select. The selection can then be grabbed as an object or manipulated in numerous ways.,
  • Drag Freehand -- Allows you to select an area by dragging a freehand outline or by clicking to create a series of connected straight lines around the portion of the image you want to select. Finish the selection by right-clicking.
  • Magic Wand -- Allows you to select a contiguous area of the same color, based on the color you click on in the image.
  • Brush Select -- Allow you to select an area of the image based on the size of the brush you use to make the selection.,
  • Select All --Selects the entire image.
  • Invert Selection - Reverses the current area selection. For example, if a small rectangle in the center of an image file is selected, and you then click the Invert button, everything but the small rectangle will be selected.,
  • Replace -- Indicates that the next selection you make will replace the current selection.
  • Add -- Indicates that the next selection you make will be added to the current selection.
  • Subtract -- indicates that the next selection you make will be subtracted from the current selection..

To display the Area Toolbar, choose Area toolbar from the View menu. A check mark beside this menu option indicates the Toolbar is currently displayed.


Object Toolbar

Appears automatically when the current file is an image file in the image editor, with at least one object in the image window.

The Object Toolbar allows you to move and modify objects in the image window as follows:

  • Move Object -- Allows you to click on the object and drag it anywhere within the image window.
  • Trim -- Allows you to trim away unwanted portions of the object.
  • Blend - Allows you to indicate portions of the object that are semi-transparent, or blended into the background.
  • Magic Wand - Allows you to trim a contiguous portion of the same color from the object, based on the color you click on in the object.
  • Size - Adds sizing handles around the object, so you can click the handles to drag the object larger or smaller, wider or taller.
  • Rotate - Adds rotate handles around the object, so you can click the handles and drag them in either a clockwise or counterclockwise direction to rotate the object.
  • Edit Text - Gives you access to the text cursor, which allows you to edit the text. The text cursor is initially at the far right edge of the text object. Click the right arrow key to see the cursor.


Filter Toolbar

Available when the current file is an image file in the image editor.

The Filter Toolbar allows you to draw special effects, known as filters, on the current image. The Filter Toolbar provides you with the following tools:

  • Blur -- Softens the area you drag the mouse over.
  • Sharpen -- Sharpens the area you drag the mouse over.
  • Adjust Color -- Adjusts the color (RGB, HSL or HSC) of the area you drag the mouse over.
  • Zoom -- Zooms the window in by one level with each left mouse click on the image, and zooms out with each right mouse click on the image.
  • Posterize -- Reduces the number of colors in the area you drag the mouse over.
  • Gray-scale -- Converts the area you drag the mouse over to shades of gray.
  • Texture -- Creates a textured effect on the area you drag the mouse over, using the colors of the current object. Requires an object in the current image window.
  • Texture Recolor -- Applies a a texture of the current object, using the hue and saturation of the object and the lightness of the background image. Requires an object in the current image window.
  • Smudge -- Smears the colors of the area as you drag the mouse.
  • Shuffle -- Shuffles the pixels of the area as you drag the mouse, for a speckled effect.
  • Stamp -- Paints a repeating pattern of the current object as you drag the mouse. Requires an object in the current image window.
  • Stamp Recolor -- Applies a stamp, using the hue and saturation of the object and the lightness of the background image. Requires an object in the current image window.

Notes:
Select the appropriate size and shape brush from the Shapes Toolbar when using the Filter tools.
If an area is selected, the Filter tools will apply only in the selected area.

To undo a portion of the filter you applied, immediately click or drag with the right mouse button on the portion you want to undo.

To display the Filter Toolbar, choose Filter Toolbar from the View menu. A check mark beside this menu option indicates the Toolbar is currently displayed.


Paint Toolbar

Available when the current file is an image file in the image editor.

The Paint Toolbar allows you to paint on the current image. The Paint Toolbar provides you with the following tools:

  • Freehand -- Allows you to paint a freehand design on the image.
  • Lines -- Allows you to paint a straight line on the image.
  • K-lines -- Allows you to paint a series of connected lines on the image. Complete the image by right-clicking.
  • Frame -- Allows you to draw a rectangular outline on the image.
  • Round Frame -- Allows you to draw a rectangular outline with rounded corners on the image.
  • Ellipse -- Allows you to draw an ellipse outline on the image.
  • Filled Rectangle -- Allows you to draw a solid rectangle on the image.
  • Filled Round Rectangle -- Allows you to draw a solid rectangle with rounded corners on the image.
  • Filled Ellipse -- Allow you to draw a solid elliptical shape on the image.
  • Airbrush -- Allows you to apply an airbrush effect to the image.
  • Flood Fill -- Allows you to fill all contiguous pixels of the same color you click on with the paint color.
  • Grab Color -- Allows you to click on a color in the image and grab that color to the palette to then paint with it.
  • Recolor -- Changes the hue and saturation of the area you paint over to that of the foreground or background color, depending on whether you paint with the left or right mouse button, respectively. Keeps the lightness of the image background.
  • Foreground Color -- The color you paint with when using the left mouse button. To change this color, click the button and select a color from the Color Picker box.
  • Background Color -- The color you paint with when using the right mouse button. To change this color, click the button and select a color from the Color Picker box.

Notes:
Select the appropriate size and shape brush from the Shapes Toolbar when using the Paint tools.
If an area is selected, the Paint tools will apply only in the selected area.

To display the Paint Toolbar, choose Paint Toolbar from the View menu. A check mark beside this menu option indicates the Toolbar is currently displayed.


Brush Shape Toolbar

Available when the current file is an image file in the image editor.

The Shape Toolbar allows you to select just the right size and shape of brush for trimming objects or painting on images or applying filters. The brush shapes include eight sizes of round brushes and six sizes of square brushes, with the smallest square equaling one pixel in size.

To display the Brush Shape Toolbar, choose Brush Shape Toolbar from the View menu. A check mark beside this menu option indicates the Toolbar is currently displayed.


[Return to Help Contents]